.

custom, digital, and natural
THIS IS A WORK IN PROGRESS - WE WILL ADD MORE MATERIAL SOON
How to make it
Research
we started to understand how to design a customizable bike frame that fits perfectly on the cyclist body.
we mainly use online tools like this one:
http://www.pianetaciclismo.com/categoria/calcolatori/calcolo_misure_telaio.html
togheter with the mesure we design the "behave" of the bike, chenging in particular the angle of the saddle and the fork
the bike is pretty nervous, reactive and agile, but the wood makes the ride very soft and relaxing

3D design
the first prototype is comparable to a "61 c-c" for a race bike, so a pretty big frame.
in the 3D file you can find the STL files we used for the CNC.
PLEASE NOTE!
only scale\stretch the model to fit your size is not recommanded. We suggest to evaluate better the dimension of the frame.
what we didn't do: we thought a lot to use some FEM simulation to better understand how to design the frame, but our skills in that field, were not enough.
interested in develop it? please contact us!

Kind of wood
the bike is realized with different layers of wood, the inner ones are lighter the externals done with more resistant woods.
being the first propotype, we used good materials, and we choose them mainly because of the colors.
the main material is ash, with a layer per side in cherry-wood.
we did some research online, to understand better how the wood works. this is one of the most complete text:
http://www.fpl.fs.fed.us/documnts/fplgtr/fpl_gtr190.pdf
Prepare the wooden blocks
we started to understand how to design a customizable bike frame that fits perfectly on the cyclist body.
we mainly use online tools like this one:
http://www.pianetaciclismo.com/categoria/calcolatori/calcolo_misure_telaio.html
togheter with the mesure we design the "behave" of the bike, chenging in particular the angle of the saddle and the fork
the bike is pretty nervous, reactive and agile, but the wood makes the ride very soft and relaxing

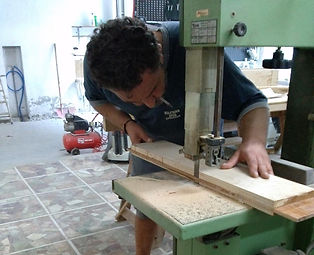
Create the rought structure to mill
It's very important to connect the wooden blocks properly, The most fragile points of the structures are the glued connections.
Critical to remember: the glue works pretty well if it's applied parallel to the wood's fibers. If you glue perpendicular fibers, you'll have a weak connection.
to make the connection we suggest to use this (more "traditional" technique):
http://www.tuttofaidate.com/media/catalog/product/d/i/dis_b_ip_lav.png
or this (the last one in the picture, possible to do with a CNC router) :
http://www.cantarinigroup.it/foto_prodotti/fresatrici_f10_-_450_1_1.jpg

Glue pieces together
it's very important to keep under a constant pressure the pieces while tre glue dries
the easier way is to use extra pieces on the inside and outside
after that use small triangular pieces to increse the pressure you can make, as you see in the picture
Put the piece in the machine
add to the main piece extra wooden blocks to attach everything to your milling machine with screws
glue them with a mild glue, easy to remove, but strong enough to keep the frame stand still
to be sure about the position in the CNC router, we suggest to mark the position of the screws both on the bed and on the piece. this should help you to properly place it without mistakes.

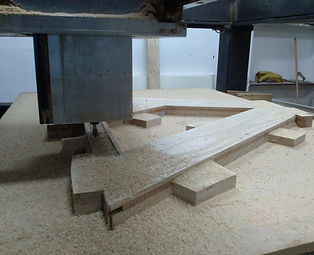
Start from the inside
the main triangle of the frame is made by two shells. the first face to mill is the inside
the structure must be hollow in order to have a reasonable weight
after you flip the structure, you can take away the extra elements just hitting them with a smal hammer.

Flip it and carve the outside
One you have done the inside, you can flip it and screw it back to the CNC bed
as before, use the machine to mark on th ebed the position of the screw to properly aligh the frame
do all the processes needed to get to the finishing

Repeat the operations and prepare the parts
after you finish the first part, just repeat all the steps you've seen before to obtain the second half
please note: the inner faces has holes to align them more easily
before glueing the two shells together, place the tubes for the saddle, the fork and the bottom bracket.
the have a more resistent and lighter connection you can drill holes into the tubes.

Glue the two shells
using the wooden pins and the metal tube, assemble the two shells of the frame
use clamps or vacuum table to keep it under pressure
after the glue is properly cured, remove the clamps and prepare the machine for the rear fork.

The rear fork
the parts of the rear fork are milled separately
the geometry used and the metal tube used in the bottom bracket should guide a lot the assembly and make it very resistant
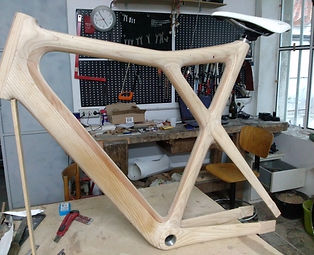
Assemble the pieces
with this the wooden parts are finished
just sand paper it until it's perfectly smooth

Mill the aluminium parts
Usually it's possible to ask to pretty big bike shops to make this piece, just in case you cant work with aluminium
our suggstion is (obviously): "Do It Yourself!"

Mill the aluminium parts
Usually it's possible to ask to pretty big bike shops to make this piece, just in case you cant work with aluminium
our suggstion is (obviously): "Do It Yourself!"